The post Spending Gold Tips for Warlords of Aternum – Potions of Knowledge appeared first on DolyGames.
]]>Potions
These potions are very useful to rank up your Army, especially for those units which you don’t use very often (we still need to rank all of them up to be successful in, for example, Tavern Stories). There are 4 types of potions:

Merchant vs. Dewport
In this blog I am focusing on tips for potions sold at the Merchant and at the Dewport’s Merchant Ship (the smallest ship).

Merchant Potion Prices
The prices at which the Merchant sells the potions:
- He sells the Lesser Potion of Knowledge for 200 gold coins
- The 5000 XP potion for 1000 gold coins (which is same as 5 x 200 gold)
- The Greater 25000 XP potion for 3000
- And all of these can have a chance to be on a 25% discount
| Potion Type | Merchant normal prices | Merchant with 25% discount |
| Lesser Potion of Knowledge | 200 | 150 |
| Potion of Knowledge | 1000 | 750 |
| Greater Potion of Knowledge | 3000 | 2250 |
| Epic Potion of Knowledge | – | – |

Dewport’s Merchant Ship
On the other hand, although it is not possible to buy potions directly from Dewport, it is very much possible to get them to drop based on various chances (as below).
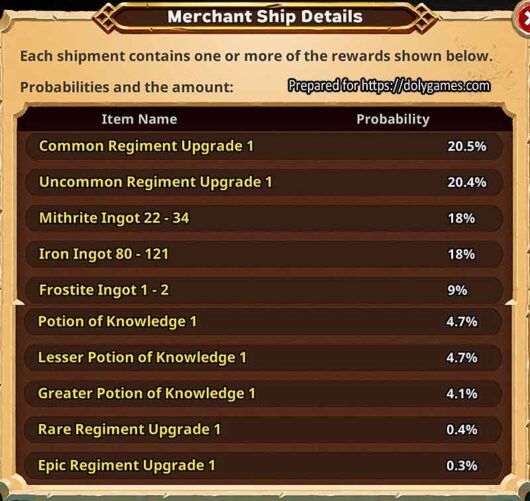
And knowing the chances we can calculate, for example, how many purchases are needed to get 1 Greater Potion of Knowledge. The chance, as we see on the table, is 4.1% and the gold cost is:
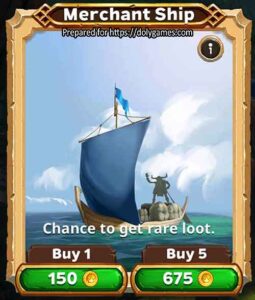
- 150 gold if you buy 1 (I don’t recommend this)
- 675 gold if you buy 5
- which makes it 135 gold per 1 purchase (when buying in lots of 5)
So for 4.1% we need to buy, in average, 25 ships (5 x 5) which is going to cost us 3375 gold.
On the first glance this looks to be more expensive than the Merchant, but this is not the case. Here is why:
Ship Table with Chances and Results
When we pay the 3375 gold and get our Greater Potion there are 2 huge benefits that comes with that:
- We have a chance to get more than 1 potion.
- We get a ton of other useful items!
Let’s look at the table below to see:
| Dewport’s Merchant Ship Items | Chances | For 25: |
| Common upgrade item | 20.5% | 5 |
| Uncommon upgrade item | 20.4% | 5 |
| Mithrite Ingot (22-34) | 18.0% | 5 |
| Iron Ingot (80-121) | 18.0% | 5 |
| Frostite Ingot (1-2) | 9.0% | 2 |
| Potion of Knowledge | 4.7% | 1 |
| Lesser Potion of Knowledge | 4.7% | 1 |
| Greater Potion of Knowledge | 4.1% | 1 |
| Rare upgrade item | 0.4% | 0 |
| Epic upgrade item | 0.3% | 0 |
So we can see that we would get not only 1 Greater potion but also:
- 5 common items
- 5 uncommon items
- a bunch of extra ingots of 3 different qualities
- one more Lesser potion
- one more 1000 XP potion
- and a chance to get more of anything
Exceptions or Limited Purchases
If we buy only 1 time then, of course, there is a chance not to get the item we want. So when I say we will get a Greater Potion of Knowledge from 25 potions, it is important to understand that this is correct in average. This means if one buys 1000 times then in average there will be 1 potion per 25 purchases, but if one buys only 1 time 25 it is possible that the potion does not drop (although a lot of other items will).
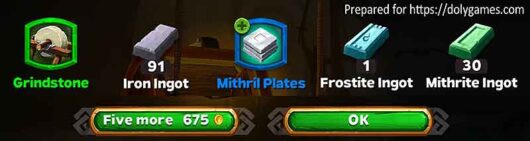
Here is an example of what I got on my first purchase of 5 ships:
I think it is actually really good because I got a rare item (0.4% chance) which I needed!
Tips for Warlords of Aternum – CONCLUSION
Based on my analysis, the tips I can share with you are as follows:
- If you have to make a choice it is better to buy 5 lots of Merchant Ship at Dewport rather than paying for 1 potion at the Merchant.
- If the potions at the Merchant are on a 25% discount they are a good value to buy (even though you give up some extra items that you would get if you bought ships).
- Obvious, but just to add: if you have tons of gold then naturally you can buy both.
The post Spending Gold Tips for Warlords of Aternum – Potions of Knowledge appeared first on DolyGames.
]]>The post Alliance EXP: How to earn it in State of Survival appeared first on DolyGames.
]]>There are currently 2 main ways to earn it:
Alliance Tech: Donation
This not only supports your alliance (and consequently yourself) by developing Alliance Technology giving everyone additional buffs, but also every click you make for the Donation gives Alliance EXP!
Have a look at this picture:

Here you can see that you get 120 Alliance Experience (as well as 120 Achievement Points and 336 Alliance Honor for the shop).
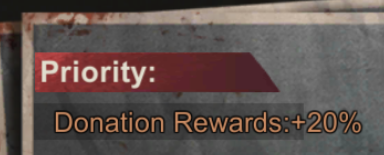
Tip: it is important to remember for Alliance Tech to assign the Priority. And don’t forget to keep it updated as Alliance tech finishes. If members donate to another one without Priority they will get less rewards.
Most players will use resources to Donate, which means a maximum of 25 times per go or +1 click per 10 minutes for the super active players. This, naturally, has a daily limit. However, there is also the possibility to do unlimited donations with Biocaps. Although, bear in mind that this can get quite expensive.

Info: there is also a Donations Ranking where you can see who are the most supportive (or most active) players.
Daily Reward Chests for Alliance EXP
The second way to earn Alliance EXP is to complete daily quests. These can be done also by all alliance members to maximize the benefits. However, since these can be more time consuming or more difficult than the very simple “Donation” then the more experienced and active alliance members should support everyone to get these done to the maximum.

The Alliance EXP is not immediately visible. However, if you click one of the chests you will see it at the bottom of the rewards list. It ranges from 20 Alliance EXP up to 100 Alliance EXP for the final reward.

Conclusion
At the time of writing this blog post there are 2 main ways to earn Alliance EXP:
- Earning via Donation clicks under the Alliance Tech
- and Earning via completion of Daily Rewards
All alliance members, big and small, can contribute daily and boost the Alliance Experience quickly.
The post Alliance EXP: How to earn it in State of Survival appeared first on DolyGames.
]]>The post 10 Tips: How to get 5 kills (X kills) in a row in Conqueror’s Blade? appeared first on DolyGames.
]]>Clarification
- Hat-Trick: Defeat three enemy heroes in a row.
- Quad Kill: Defeat four enemy heroes in a row.
- No Quarter: Defeat five enemy heroes in a row.
- God of War: Defeat six enemy heroes in a row.
- Noble Cause: Defeat seven enemy heroes in a row.
These quests need X amount of kills one after another, which means that if your hero dies the counter is reset to zero. So if you killed players 20 times in one battle but died every 3rd or 4th time you will not get a single point for the “5 kills in a row” quest.

Tip #1 – Use Enemy Desperation
When you are the attacker and taking the last point to win the game, very often the enemy heroes will, in desperation, run onto the point ahead of their units just to stop the capture.
This is the perfect opportunity to get many kills because your hero is there together with your unit and your allies with their units while the enemy is just throwing themselves onto you for slaughter just to win a few seconds of capture-prevention.
Tip #2 – The Javelin Build
If you have higher-tier Javelin units (Sergeants + Imperials or just one with more careful management) then you can dedicate the game to running around and sniping enemy heroes with your javelins.
As hero supporting the javelins you could either take Longsword to support heal them or Musket/Bow for the bomb/explosion to pinpoint or finish off the enemy hero supporting the javelins.
Tip #3 – The Melee Hunter
If you have units with Cover Commander skill (Spear Sergeants, Imperial Shields, Men-at-Arms) then not only you can support the battle but also, in parallel, you can hunt enemy heroes to get your kills.
This works good with Poleaxe for example whereby you cc enemy hero with your skills and your units are right on top of you providing the damage output which you are missing.
There are 2 reasons for Cover Commander:
- Support you with damage output in a focused space.
- Help prevent your hero from dying (which would reset the kills counter for the quest)
Tip #4 – Use a Ballista (or 2)
This is a “more expensive” option, but you can setup a Ballista (or even 2 to get a faster shooting output) and focus on sniping enemy heroes from relative safety who may be busy defending a point.
The placement / location of the installation is extremely important to:
- Have as large as possible area to target (more options).
- Be hard to reach by enemy heroes.
I personally do not like this option because one would need to do this multiple times to complete the quest which would cost a lot. But if you have a lot of silver or want to get this quest done fast this could certainly be one of the faster options.
Tip #5 – Using Charging units
You could setup your entire Warband with charging units (Imperial Pikemen have the strongest infantry charge) and bulldoze over enemy heroes – good opportunities can be capture points where multiple may be fighting to capture or defend.
For this:
- Imperial Pikemen would be able to clean up with the charge but may die after.
- Condottieri have a weaker charge but can do shock attack after which can help kill not only the enemy hero but the units too.
- Prefecture Guards are also very powerful with the Drill and usually stronger than Condos.
- Of course if you have top tier units like Reapers…
Tip #6 – The Rattan Run Around
If you have the unit you can use Rattan Rangers cavalry exclusively to run around with the only purpose to hunt down enemy heroes.
While it may seem you are not supporting the battle you actually are because when you kill the hero then his/her unit retreats and it takes longer and longer for them to respawn supporting your team to win the battle.
Tip #7 – Field Battle Cavalry
If you have strong and experienced cavalry units then you can play Field battles exclusively and simply run over any weaker hero avoiding any difficult fights with higher tier units.
While this may be a more “chicken” way of playing it can certainly help complete the quest at least.
Tip #8 – Imperial Advance
If you have the Imperial Pike Guards – they have a unique ability to Advance onto the enemy. You can use this when capturing points or defending when there are multiple enemy heroes on the point.
Their Advance will kill everything in front of them so if used properly (and in combination with your hero – use a PvP weapon) this can help get multiple enemy hero kills.
Tip #9 – Pavise Penetration
If you have the Pavise Crossbowmen you can focus your efforts on managing them (also called babysitting) – if you place them well they can not only kill multiple enemy heroes but also units.
It is important for this to also careful manage their shields. You don’t want any one of them to die so you would need to protect them with their shields if there is a risk of enemy ranged unit, but at the first opportunity you need to switch quickly to maximize damage output.
As you need to babysit this unit (too expensive to lose them) it is better that you use a hero / weapon which “forces” you to stay near them. This can be, for example, a Longsword to heal them or Glave/Poleaxe if you are playing very aggressive and need to hold off enemy hero/units from hitting them.
Tip #10 – Stop Dying
Last, but not the least, is a simple but important phrase “Stop Dying”. Most of the time this quest fails because your hero dies. If the hero did not die you have 3-5 units per battle which can go fight and support you to get those kills.
Sometimes it’s very difficult to be patient and not rush into the thick of the battle. And other times it can simply be your Light Armor. So:
- Using Longsword as hero with Armor/Toughness makes it very difficult to kill your hero as you constantly heal and don’t take as much damage with Heavy Armor. (don’t forget to use your shield)
- Using Shortsword as hero: while there is no healing skill the Ironslides skill greatly increases Armor and so it is very difficult to kill a Shortsword hero. I have seen multiple times 3-5 heroes jumping on one Shortsword and not managing to kill. (don’t forget to use your shield)
- Using ranged heroes (Bow, Shortbow, Musket) can help you stay away from the battle. However with lighter armor you are at risk if the enemy does reach you.
Other Tips I did not mention
There are multiple other ways:
- Using ranged units around corners when the enemy hero follows you then your entire unit shoots and kills him. I did not mention this above because it is rather rare to produce these setups consistently.
- Or using ranged units in general, especially any firearm unit. Firearm units have a huge armor penetration and therefore are superior at killing enemy heroes.
- Namkhans’ poison prevents the enemy from healing for a long time. This helps in finishing them off. However Namkhans also die easier and are very situational which is why I did not mention them above.
- If you are good at PvP then you can get multiple kills fast in Deathmatch battles, but the reason I did not mention this is because if you are already good at PvP then you probably don’t need these tips 🙂
- Spamming top tier units: if you are not worried about your funds then using top tier units aggressively can get you those kills, but you may end up losing units for which you must pay high re-supply costs.
Read more guides, tips, analysis on my Conqueror’s Blade Blog:![]()
The post 10 Tips: How to get 5 kills (X kills) in a row in Conqueror’s Blade? appeared first on DolyGames.
]]>The post Can you make profit selling Well-Made Mortar in Conqueror’s Blade? appeared first on DolyGames.
]]>10 Well-Made Mortars Business Case
I am showing here the calculation for 10 Well-Made Mortars:

To produce 10 we need:
- Improved Copper x 1,000 (Silver tax 5,000)
- Cast Iron x 1,000 (Silver tax 5,000)
- Planed Wood x 500 (Silver tax 2,500)
- Cut Stone x 500 (Silver tax 2,500)
- and 5,000 Silver
The silver taxes in total add up to 20,000 and this is the main cost element.
Then we calculate what the resources would be worth if we would sell them on the market instead of producing the Well-Made Mortar (in this case resources means the basic resources + exotics required to craft the improved versions of Materials):
Also let’s take cheap/low prices for these as sometimes players can gather more resources than they manage to sell.
- Resources for Improved Copper minimum price per piece = 0.1 x ~10,000 needed = 1,000 silver cost + minimum price of 2,50 per 1 exotic = 2,500 Silver + resources = 3,500 Silver
- Resources for Cast Iron minimum price per piece = 0.1 x ~10,000 needed = 1,000 silver cost + minimum price of 2,50 per 1 exotic = 2,500 Silver + resources = 3,500 Silver
- Resources for Planed Wood minimum price per piece = 0.02 x ~5,000 needed = 1,00 silver cost + minimum price of 2,50 per 1 exotic = 2,500 Silver + resources = 2,600 Silver
- Resources for Cut Stone minimum price per piece = 0.02 x ~5,000 needed = 1,00 silver cost + minimum price of 2,50 per 1 exotic = 2,500 Silver + resources = 2,600 Silver
- Results in total of 12,200 silver cost. (and it could be argued to take a higher or lower amount for this depending on your attitude / perception regarding resources for crafting)
The 20,000 silver tax + 12,200 silver cost of resources = production cost of 32,200 silver.
The minimum price at which we can sell a Well-Made Mortar = 4,950 silver (the reason i am using the minimum is because there are many on sale which pushes the price down to the minimum). That means 49,500 for 10 pieces.
This results in a pre-tax gain of 17,300 silver.
On this the auction system will take 10% tax (this may change some day but today it is 10%) which is 4,950 silver.
So the final result is:
- 49,500 gain
- less 4,950 silver auction 10% tax
- less 32,200 silver total production cost
- is equal to 12,350 silver profit. However, note that this value would go down a lot if we take higher than low/minimum prices for resources and exotics.
But could take a long time to sell
This is because:
- There are lots of Well-Made Mortars on sale so the chance of the buyer picking your offer is small.
- Also sometimes there are events which give high-tier artillery as rewards which would directly negatively influence Auction sales.
Careful with Weight!
Artillery pieces are very heavy and take a lot of space in your camp. Crafting a bunch of them blocks space which you need to store excess resources.
So definitely don’t craft many Well-Made Mortasr at once. I craft them in packs of 5 and only craft the next 5 when the first batch gets sold. This way I don’t block any space in the camp.
Don’t forget about Timing!
Make sure your Artillery sales do not expire before Territory Wars. While you can make sales on other days the days when there is a Territory War offer a higher chance / motivation to buy/sell Artillery, especially the types more popular during TW (not Scorpio for example).
How to do?
- If your sale is expiring soon cancel it and re-post it to refresh the timing.
- If TW is coming in the next 2 days then put on sale for a 3 day duration (ideal).
- Watch out for the “Pending” time required for your artillery offer to go live – items don’t appear in the market/Auction immediately. I have seen both 5 hours waiting times and 1-2 hours waiting times and these are decided by the devs, so know what the preparation time is for the moment you are playing (it is the same for any item usually changed only on Maintenance days IF they decide to do that).
I hope this calculation on Well-Made Mortars was useful to you and helps you make the best decisions for your hero in Conqueror’s Blade.
Read more guides, tips, analysis on my Conqueror’s Blade Blog:![]()
The post Can you make profit selling Well-Made Mortar in Conqueror’s Blade? appeared first on DolyGames.
]]>The post Which are the Best Units in Conqueror’s Blade (Cost/Effective) appeared first on DolyGames.
]]>Prevail split the units in the several categories shown below:
Note: golden Era units are excluded as they are awesome as they are so no point discussing them (except Cataphract Lancers which everyone seems to hate).
Note #2: listed units are not in any order, so the ones on top are not automatically better.
“Must Buy” Units

- Condottieri Guards & Prefecture Guards similar job and both perform it well; some preference towards Condottieri.
- Spear Sergeants: one of the best units in the game for multiple purposes.
- Imperial Spearmen: impenetrable defensive unit.
- Pike Militia (middle line veteran skills): absolutely great to buy – they do a fantastic job and sometimes better than some more expensive units. Additional comment from me: I also love their speed and sometimes I manage to get more kills with Pike Militia than even my Fortebraccio Pikemen.
- Imperial Pikemen: possibly the best pushing unit in the game. Insane damage when using the Advance ability.
- Fortebraccio Pikemen: also great but not as good as the Imperials at pushing, but very good otherwise, especially defending tight passageways in which case they are better than Imperials.
- Namkhan Archers: cheap and effective. Very good bleed.
- Prefecture Archers: cheap and effective. Melt anything that has no armor (i.e. not heavy armors)
- Imperial Arquebusiers: must buy for Territory Wars. The Vollery fire has one of the highest DPS (damage per second) in the game.
I would also add Pavise Crossbowmen – they are pretty insane although they may be nerfed i the future.
“Good for the price” Units
- Men at Arms: good overall; shield wall + heal. Additional comment from me: a lot of players hate MaA and say that they perform very badly, while other players love this unit.
- Demesne Spearmen – great to use especially for starting players. Additional comment from me: I quickly got the Spear Sergeants and I almost never used my Demesne Spearmen, so don’t invest too much in these but indeed good to use for new players.
- Halberdier Sergeants
- Kriegsrat Fusiliers: good but Prevail prefers Imperials over these. Additional comment from me: If the team can protect the Imperial Arquebusiers then indeed they are better, but you can see my analysis comparing these 2 units. In an unpredictable game where your team does not necessarily protect you (e.g. daily Siege battles) i think Kriegs are better.
- Prefecture Cavalry: very fast in fights and the charge is OK.
- Dagger-Axe Lancers: better than Yeomen, more tanky.
I would also add to this list Ironcap Arquebusiers when upgraded fully. They have low leadership cost and hit really hard, but they are nearly useless on lower levels.
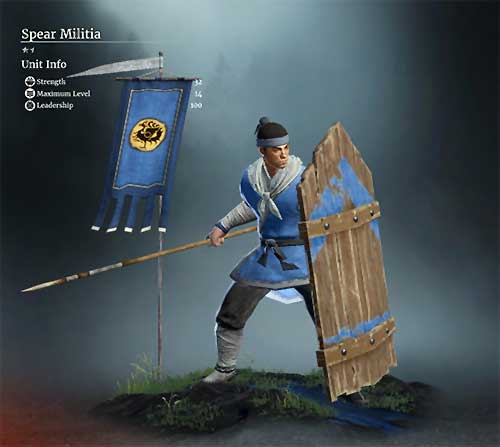
And I would also add here Spear Militia which is a very effective very low leadership cost large shield “wall” unit. I have used mine very effectively in various battles.
“Good but very situational” Units
- From Mercenaries: Martellatori: they are used to push Siege Towers.
- Tseregs: designed for a specific job to counter other Melee units, so not very good at general purpose.
- All Javelins: very situational. Additional comment from me: some players use Javelins very effectively killing many units and heroes and running back to re-supply. But indeed most layers have a hard time using javelin units effectively.
- Imperial Archers: have Bodkin arrows which can hurt heavy armor.
- Vassal Lonbowmen: very high range, can kill any ranged units. Additional comment from me: it is critical to get the placement right with these because enemy bow Heroes love targeting longbowmen.
I would also add Falconetti Gunners here, because in specific situations, if they are protected by the team, they can complete decimate multiple units and heroes of the enemy.
“Obsolete” Units
- Squires – no reason to use them; Condo / Pref.Guards do a lot better job
- Palace Guards – counterparts (MaA / Tseregs) do a better job
- Regular Halberdiers
- Vanguard Archers: have no special use, no reason a player would pick them over Namkhan or Prefecture Archers.
- Yeomen
“Don’t bother” Units
- Demesne Arquebusiers: ok units but way worse than the higher tier counterparts
- Demesne Arbalists: ok units but way worse than the higher tier counterparts
“Is that a unit?” Units
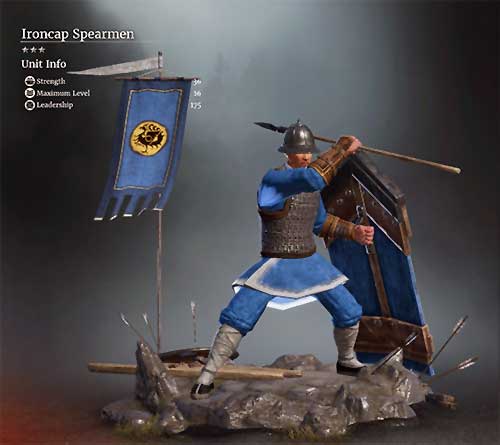
- Ironcap Spearmen
- Prefecture Pikemen = “Halberdiers that cannot brace” I like that 🙂
- Rattan Vipers: similar explanation as Vanguard but even worse
- Rattan Marksmen: similar explanation as Vanguard but even worse
- Khevtuul Cavalry: makes no sense
Prevail’s Video
My Conqueror’s Blade Blog Homepage
Read more guides, tips, analysis on my Conqueror’s Blade Blog:![]()
The post Which are the Best Units in Conqueror’s Blade (Cost/Effective) appeared first on DolyGames.
]]>The post Poll Results: What’s more important Weapon or Player Skill? Conqueror’s Blade appeared first on DolyGames.
]]>Poll Design
Title: Poll: PvP by weapon or player skill?
Extra info: If unsure which or if you think maybe both please choose the option that is the most important part.
Vote option 1: Weapon decides (e.g. weapon specialized for PvP)
Vote option 2: Player skill decides (good skill can win with any weapon)
Poll Results
Weapon importance
Player Skill importance
100 players voted, 39 chose “Weapon decides” and 61 chose “Player skill decides”.
Selected Poll Comments
Here are several comments I selected from people’s opinion showing different elements / reasons:
Kagerou_Daze
Weapon choice usually comes before skill. I mean anyone can play shortsword effectively without any game sense or knowledge. The same can’t be said for shortbow or nodachi. You can have 5x the skill of another player but be matched longbow vs dualblade and never win. So weapon decides. Those who voted for player skill decides probably play low skill weapons like Shortsword and Maul.
My comment on this: I think that’s a good point about bow/dualblade. Bow has a tendency of having a tunnel vision being focused on sniping its targets, so if a dualblade player catches the bow with his ultimate I would wager even an average skilled assassin would kill a high skill bow.
xEppyx
For PVP, definitely player skill. For duels, generally the weapon decides.
My comment on this: I think by PVP here it’s meant in battle. This could very well be true – an interesting point.
Kirikoe
Honestly have a friend who can pick up any weapon and just wreck almost anyone in a 1v1 , there are obviously issues with each weapon which even he recognizes but enough skill can compensate for it
My comment on this: I had a similar experience i fought once with a player who killed me so efficiently (without me hurting him almost at all) that i still don’t know how he managed to do it 🙂
ruleofKon
If we’re talking about siege gameplay, which is a majority of what this game is. It’s a combination of both.
Choose the weapon that best facilitate your troop load out and have the skill required to effectively use your weapon.
For example. If a dual blade duels a glaive, chances are, the glaive will lose the fight pretty handedly (considering both players are of equal skill). Glaive skills are slow and dual blades are fast. Now if you give both players a unit of condottierri guards to slug it out with them then 100% of the time the glaive will win. The glaive can hard CC groups of units pretty easily and in no situation will the dual blade be able to support his troops.
Weapon matters in terms of what they’re being used for, but skill does come into play. Glaive, again, can hard CC and break formations. The difference between you CCing at the right time and completely miss the timing can result in a very dead you and your troops.
The quality of weapon plays into this also. Higher damage weapons for dual blades means they can deal more damage in a shorter amount of time. Higher blunt damage on glaive means the Flying Reaper ult can utterly decimate units and heroes.
My comment on this: I like this comment very much. The comparison with glave working together with units I think is spot on.
Poll Conclusion
Based on the players voting, the winner is “Player skill decides”, so the majority of voters believe that if you are very skilled in playing Conqueror’s Blade then you will do great no matter what weapon you hold.
Looking now after the results I am glad this is the option that won because that means if you practice and improve your skill you can have fun switching around using various weapons.
If the weapon was the focus you would be forced to stick to a specific weapon and miss out on the variety of all the weapons.
Finally a small comment on the poll sample size. 100 is not bad but is not a huge number either so some inaccuracy naturally comes due to sample size. However, the results were not close like 49/51. We have 39/61.
Did you like this Conqueror’s Blade poll results blog post? Do you have other poll ideas or opinions on this specific poll (then comment below)?
The post Poll Results: What’s more important Weapon or Player Skill? Conqueror’s Blade appeared first on DolyGames.
]]>The post Seasoned Wood Business Case – Conqueror’s Blade Blog appeared first on DolyGames.
]]>Still, the silver tax for refining raw resources into Materials is the same for all resources so I was looking at Seasoned Wood to understand what is more profitable – to refine the material yourself or to buy it directly from the market?
Seasoned Wood – to Refine or to Buy?
I am using a quantity of 2000 Seasoned Wood for this analysis.
In the table below I present the cost of the production of Seasoned Wood (refining resources to Material). Here we can see that there is a small difference depending on which type of Timber, however, we also see that this is negligible and the major cost is the Silver tax.
| Timber Type | per 1 Wood | Silver Tax per 1 | Total Wood needed | Total Silver tax | Minimum Res cost | Res cost Total | TOTAL COST |
| Pine Timber | 10 | 2 | 20,000 | 4,000 | 0.02 | 400 | 4,400 |
| Ash timber | 8 | 2 | 16,000 | 4,000 | 0.04 | 640 | 4,640 |
| Oak timber | 7 | 2 | 14,000 | 4,000 | 0.05 | 700 | 4,700 |
| Cedar Timber | 6 | 2 | 12,000 | 4,000 | 0.06 | 720 | 4,720 |
Comparing with Price of Seasoned Wood
Minimum price:
If we were to sell the Seasoned Wood at the minimum price allowed by the market then we would have to sell it at 1.44 per piece. Using the 2000 pieces of this analysis this would yield only 2,880 Silver (from which still 10% market tax of 288 should be paid).
This is a complete loss! (-2,128 silver) So the first conclusion we arrive at is that it is completely not interesting to Refine timber into Seasoned Wood and sell it at minimum price.
Profitable price #1?
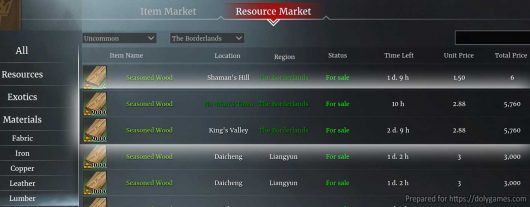
Next I checked at which price others were selling (ignoring small amounts – focusing where the big volume is) and I saw the price of 2.88 per piece.
Would we make profit at this price?
2,000 x 2.88 = 5,760 silver
less 10% market tax of 576
less the cost of production 4720
yields a net result of +464 silver.
So it is a profitable price as such. However, there are 2 problems with this:
- The profit is too small to bother with (in lots of 250 that’s only 58 silver per lot).
- And 2.88 price is not even guaranteed (anyone can undercut you at any moment) and/or does not even bring large demand so we cannot make up the small margin with a big quantity.
Conclusion
Point 1: we learn that it is a complete loss to try to sell Seasoned Wood at the minimum price.
Point 2: even at a higher price of 2.88 there is only a tiny profit (and no big demand either).
Point 3: this then means that if you are crafting artillery and can buy Seasoned Wood from the market for anything less than around 2.60 then it is more profitable to do that then bother refining the materials on your own.
Read more guides, tips, analysis on my Conqueror’s Blade Blog:![]()
The post Seasoned Wood Business Case – Conqueror’s Blade Blog appeared first on DolyGames.
]]>The post Can you make profit selling Green Cannons in Conqueror’s Blade? appeared first on DolyGames.
]]>10 Green Cannons Business Case
I am showing here the calculation for 10 Green Cannons:
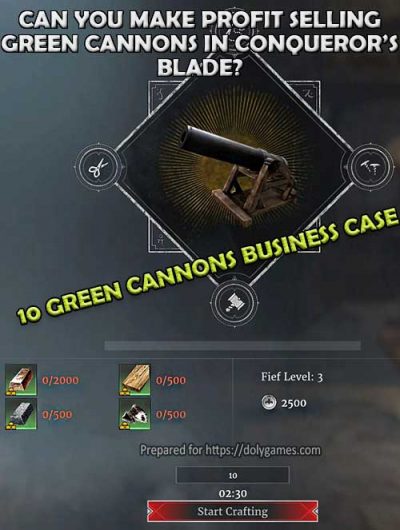
To produce 10 we need:
- Coarse Copper x 2,000 (Silver tax 4,000)
- Raw Iron x 500 (Silver tax 1,000)
- Seasoned Wood x 500 (Silver tax 1,000)
- Rough Stone x 500 (Silver tax 1,000)
- and 2,500 Silver
The silver taxes in total adds up to 9,500 and this is the main cost element.
Then we calculate what the resources would be worth if we would sell them on the market instead of producing the Green Cannons:
- Resources for Coarse Copper minimum price per piece = 0.1 x 20,000 needed = 2,000 silver cost
- Resources for Raw Iron minimum price per piece = 0.12 x 5,000 needed = 600 silver cost
- Resources for Seasoned Wood minimum price per piece = 0.02 x 5,000 needed = 100 silver cost
- Resources for Rough Stone minimum price per piece = 0.02 x 5,000 needed = 100 silver cost
- Results in total of 2,800 silver cost.
The 9500 silver tax + 2800 silver cost of resources = production cost of 12,300 silver.
The minimum price at which we can sell the Green Cannons = 2,100 silver (the reason i am using the minimum is because there are many on sale which pushes the price down to the minimum).
This results in a pre-tax gain of 21,000 silver.
On this the auction system will take 10% tax (this may change some day but today it is 10%) which is 2,100 silver.
So the final result is:
- 21,000 gain
- less 2,100 silver auction 10% tax
- less 12,300 silver total production cost
- is equal to 6,600 silver profit.
…But the truth is:
OK, so the first good news is that there is a profit.
However, it is only 660 per cannon and this would be impressive if we could sell hundreds of cannons gaining a lot of silver.
But the truth is that it could take players a long time to actually make a sale. At the moment I am selling packs of 5 around 1-3 times per week. PER WEEK! That’s really not much at all!
This is because:
- There are lots of green cannons on sale so the chance of the buyer picking your offer is small.
- If players get more lucky to get green artillery in battle loots they will buy less.
- If there are any events which give green artillery as rewards this would directly negatively influence cannon sales.
…But we can still try / CONCLUSION
The main reason I started with bothering to waste additional time in crafting artillery for sale is because I was already selling a lot of resources, i.e. I was mining a lot more than the speed at which the market was buying them.
This resulted in me having a lot of excess resources so I was investigating how to “get rid of them”, i.e. convert them into other things to sell in parallel to my regular resource sales.
Crafting artillery is one of the ways to get this done.
So…
Given that the profit is not horrible (660 per cannon) and that they do sell sometimes I may still try to sell them until it gets frustrating and/or unless the resources sell faster.
Because if you can sell the resources faster then there is no reason to waste time in crafting Materials from Resources and then waste more time crafting Artillery from the Materials.
Last point about weight!
Artillery pieces are very heavy and take a lot of space in your camp. Crafting a bunch of them blocks space which you need to store excess resources.
So definitely don’t craft many green cannons at once. I craft them in packs of 5 and only craft the next 5 when the first batch gets sold. This way I don’t block any space in the camp.
I hope this calculation on green cannons was useful to you and helps you make the best decisions for your hero in Conqueror’s Blade.
Read more guides, tips, analysis on my Conqueror’s Blade Blog:![]()
The post Can you make profit selling Green Cannons in Conqueror’s Blade? appeared first on DolyGames.
]]>The post Quest Help: How to: withstand damage by Eastern Spearmen appeared first on DolyGames.
]]>This is very confusing because the game never explains to you the origins of different units and does not guide you in any way after being “forced” to do this quest.
This also happened to me and i was completely confused trying to use various spear units that I had and after every battle I would check if there was progress for this quest and there was zero. This was very frustrating.
An example of quest text: “Shield of the east: use Eastern Spearmen to withstand 200,000 damage”.
So which Spear units qualify as “Eastern” & which you should choose:
There are 3 units only. They can all be visually identified by their massive shields:
Spear Militia
With only 100 Leadership these are a very good “wall” unit to use in battle. They get the job done and cost very little to re-supply. They are also very cheap to unlock with Honor. Choose these to maximize your daily income per battle.
Imperial Spear Guards
These are a high tier unit, heavily used in important battles such as Territory Wars. Even though some players do, I would not recommend using these in daily battles because you will have to pay a lot of money to re-supply them given their high tier status. This would completely destroy your income. Choose these if you already have units for daily battles and/or if you do not have any “wall” unit to use in Rebel Camp battles or Territory Wars.

Ironcap Spearmen
These are in between the Imperial Spear Guards and Spear Militia, so they are neither cheap nor excellent, but a bit of both, which can work for those players who do not want to go to either extreme. I would not choose these personally since I prefer specific roles, but if you want something in between then these are for you.
Read more guides, tips, analysis on my Conqueror’s Blade Blog:![]()
The post Quest Help: How to: withstand damage by Eastern Spearmen appeared first on DolyGames.
]]>The post Useful Tip when Hunting for Camps or Derelict Huts – Conqueror’s Blade appeared first on DolyGames.
]]>Short reminder for those players who don’t know yet, it is possible to completely remove your troops and ride out of town with your hero only which makes you travel really fast (without wagon). This allows you to run around the map in a short amount of time hunting for Abandoned Camps and Derelict Huts.
My Tip
I discovered this after weeks of playing Conqueror’s Blade and I wish I knew this from the beginning.
You see, a lot of players zoom out when they are traveling on the World Map. This is very nice as it allows you to see much more.
Absurdly this is exactly what makes you find less Abandoned Camps and Derelict Huts!
Yes, that was not a typing mistake, zooming out makes it worse not easier – here is what happens and why you need to stay zoomed in:
On both of the pictures below I am standing at the exact same location.
Picture #1 – Zoomed out:
Standing here I am not seeing any Derelict Huts or any Abandoned Camps.

Picture #2 – Zoomed in:
Who would have thought?! There is actually a Derelict Hut there! I would have never caught this if i was traveling zoomed out!

Why this happens?
I believe I understand why this happens. It is not some evil conspiracy – it is just that when you are zoomed in you are more looking from the side while when you are zoomed out you are more looking from a bird’s eye view.
And so when looking from the side or behind the game knows that you have no chance of noticing Abandoned Camps and Derelict Huts and so it shows you with text only that they are there allowing you to walk in that direction until you find them.
Conclusion
Yes, it can be more annoying having to zoom in, but…
I think this is an extremely useful tip for all Conqueror’s Blade players because finding those extra Camps and Huts that you may have missed could have resulted in you finding skill pages and other rewards which you could use for your hero or sell for many thousands of silver.
Read more guides, tips, analysis on my Conqueror’s Blade Blog:![]()
The post Useful Tip when Hunting for Camps or Derelict Huts – Conqueror’s Blade appeared first on DolyGames.
]]>The post Ironcap Arquebusiers vs Imperials & Kriegsrat comparison – Conqueror’s Blade appeared first on DolyGames.
]]>Below I will be comparing stats of Ironcap Arquebusiers with the average of the 2 higher tier units; if you have not already seen the higher tier comparison you can check it here: Imperial Arquebusiers vs Kriegsrat Fusiliers.
Basic Attributes 1
You get 24 soldiers for half the leadership and significantly cheaper re-supply which results in much larger rewards after every battle. Level is naturally lower, at level 15, but that is not a major issue.
From here on Average of Kriegsrat Fusiliers and Imperial Arquebusiers I will mark as AVG. IMP/KRIEG.
| Basic Attributes | AVG. IMP/KRIEG | Ironcap Arquebusiers |
| Stars / Tier | 4.25 stars | 2.5 stars |
| Strength | 21 | 24 |
| Max level | 18.5 | 15 |
| Leadership | 267.5 | 145 |

Basic Attributes 2
Their health is lower indeed by about 35%, but it is still not as low as various archers, so if you do your best to take care of them (good placement) this will be less of an issue. Ammo I found is not an issue at all unless you get lucky with a team which protects them and allows them to constantly shoot the enemy without getting disturbed.
| Basic Attributes | AVG. IMP/KRIEG | Ironcap Arquebusiers |
| Health | 3241 | 2099 |
| Speed | 5 | 5 |
| Range | 60 | 60 |
| Ammo | 625 | 600 |
| Labour | 2.94 | 3.36 |
Attack Attributes
Ironcap Arquebusiers have nearly as much attack as the higher tiers, so this is really fantastic for the much lower cost. However, please note that they do miss more often, i.e. they are less accurate (part of that you can fix via Veteran skills by giving them a lot more accuracy).
| Attack Attributes | AVG. IMP/KRIEG | Ironcap Arquebusiers |
| Piercing Armour Penetration | 2645.5 | 2397 |
| Slashing Armour Penetration | 0 | 0 |
| Blunt Armour Penetration | 0 | 0 |
| Piercing Damage | 2674.5 | 2231 |
| Slashing Damage | 0 | 0 |
| Blunt Damage | 0 | 0 |
Defense Attributes
In terms of defense Ironcap Arquebusiers don’t fall too far behind. The Piercing defense is actually somewhat similar so they are nearly as good in taking less damage from archers. In melee they are indeed useless so if you do not manage well their placement on the battlefield and allow melee units to get to them then they will die pretty fast.
| Defense Attributes | AVG. IMP/KRIEG | Ironcap Arquebusiers |
| Piercing Defense | 371 | 311 |
| Slashing Defense | 401 | 247 |
| Blunt Defense | 276 | 179 |

Special Attributes
Here is where the most important differences are. The Ironcap Arquebusiers, at least when you start playing with them, will shoot slower and miss a lot. This may disappoint at first, but you can actually address this in a great amount by improving their accuracy and rate of fire via Veteran skills.
| AVG. IMP/KRIEG | Ironcap Arquebusiers |
| Krieg: Melee Fighters | Poor shots: low accuracy |
| Imperials: Volley | Slow shot: low rate of fire |
Veteran Skills (a.k.a. Veterancy)
As mentioned above, this is what “fixes” the Ironcap Arquebusiers by significantly increasing accuracy and rate of fire making them a very viable and effective unit to use. The higher tier counterparts get even stronger with their Veteran skills, but that is expected.
| AVG. IMP/KRIEG | Ironcap Arquebusiers |
| Aiming speed increased | Increasing damage |
| Increasing damage | Increasing rate of fire |
| Increasing rate of fire | Increasing accuracy |
| Increasing accuracy |

Analysis / Calculations
Here is what I think everything is results in:
- Full Unit Health = the number of soldiers x Health. This shows us that Ironcap Arquebusiers have 24% less Health in total which is actually not too bad given the 2.5 star vs 4+ star difference.
- Average Defense is 30% less making it important to place them strategically on the battlefield.
- Survivability Score is something I created to compare units. This score shows, connected to the above defense issue, that Ironcap Arquebusiers are a lot more squishier.
- Damage Output = Soldiers x Damage. This shows that on the most basic comparison Ironcap Arquebusiers have similar damage “on paper” has the higher tier units!
- Full Unit Potential Damage = adjusting the Damage output with several factors. This then reduces the “high-on-paper” damage value of Ironcap Arquebusiers to a more realistic 41% less level when talking about a longer term average or multiple games, which is mostly due to their low survivability.
| Elements | AVG. IMP/KRIEG | Ironcap Arquebusiers |
| Full Unit Health | 65,859 | 50,376 |
| Average Defense | 349 | 246 |
| Survivability Score | 774 | 456 |
| Damage Output | 56,277 | 53,544 |
| Full Unit Potential Damage | 40,746 | 24,176 |
Conclusion
Here is what this analysis tells the player:
- The Ironcap Arquebusiers are significantly cheaper and use less leadership than their higher tier counterparts. This means more rewards from battles for the player and ability to bring more units to the battlefield.
- Their damage output is great as long as the player is able to position them properly and protect them from melee attacks by either moving them away or by jumping forward to take the damage with the hero or getting help from allies.
- Yes, they have less defense / survivability than Imperials or especially Kriegs and they will do less damage if we take a 100 battles and compare them, but they still do have massive damage for the cost that the player would pay for them compared to the very expensive 4+ star/tier units. So used well they have definitely help win the battle as well as control the costs resulting in higher income for the player.
My recommendation for the majority of players is to choose Ironcap Arquebusiers in their daily regular battles where using higher tier units is not effective in terms of cost versus income point of view.
Read more guides, tips, analysis on my Conqueror’s Blade Blog:![]()
The post Ironcap Arquebusiers vs Imperials & Kriegsrat comparison – Conqueror’s Blade appeared first on DolyGames.
]]>The post Imperial Arquebusiers vs Kriegsrat Fusiliers comparison – Conqueror’s Blade appeared first on DolyGames.
]]>Basic Attributes 1
The leadership values are almost the same, but there is a huge difference in the number of soldiers with 18 Kriegsrat Fusiliers being 6 less than the 24 Imperial Arquebusiers.
| Basic Attributes | Kriegsrat Fusiliers | Imperial Arquebusiers |
| Stars / Tier | 4.5 stars | 4 stars |
| Strength | 18 | 24 |
| Max level | 19 | 18 |
| Leadership | 265 | 270 |
Basic Attributes 2
On this second table we see immediately a massive different in Health. Kriegsrat Fusiliers are almost twice as bulky.
| Basic Attributes | Kriegsrat Fusiliers | Imperial Arquebusiers |
| Health | 3,975 | 2,507 |
| Speed | 5 | 5 |
| Range | 60 | 60 |
| Ammo | 450 | 800 |
| Labour | 2.52 | 3.36 |
Attack Attributes
Obviously both units are doing Piercing Damage and the magnitude as well as the Piercing Armour Penetration are very similar, so we cannot distinguish any difference here.
| Attack Attributes | Kriegsrat Fusiliers | Imperial Arquebusiers |
| Piercing Armour Penetration | 2,613 | 2,678 |
| Slashing Armour Penetration | 0 | 0 |
| Blunt Armour Penetration | 0 | 0 |
| Piercing Damage | 2,637 | 2,712 |
| Slashing Damage | 0 | 0 |
| Blunt Damage | 0 | 0 |
Defense Attributes
The Kriegsrat Fusiliers definitely have a defensive advantage with values significantly higher than the Imperials (from 17% to 64% higher).
| Defense Attributes | Kriegsrat Fusiliers | Imperial Arquebusiers |
| Piercing Defense | 401 | 341 |
| Slashing Defense | 485 | 317 |
| Blunt Defense | 343 | 209 |
Special Attributes
Then we have some “special” differences. The Kriegs are good in melee mostly increasing their survivability (see more on this below) while the Imperials have a Volley damage output increasing their offensive capabilities.
| Kriegsrat Fusiliers | Imperial Arquebusiers |
| Melee Fighters: good in Melee combat | Firearms |
| Firearms | Fire by Ranks: volley constant fire |
| Fireproof | Three ranks form |
| Directed Fire: can shoot at a specified location | Poor shots: low accuracy |
| Three ranks form |
Veteran Skills (a.k.a. Veterancy)
Here, overall, it is all about increasing damage, where the Kriegs are getting there by shooting faster and more accurately while the Imperials are directly increasing damage. Ultimately it does not matter as both paths result in increased damage output.
| Kriegsrat Fusiliers | Imperial Arquebusiers |
| Aiming speed increased | Chance to break block |
| Increasing damage | Faster Volleys |
| Increasing rate of fire | Increasing damage |
| Increasing accuracy | Increasing penetration |


Analysis / Calculations
Here is what I think everything is results in:
- Full Unit Health = the number of soldiers x Health. This shows us that Kriegs are bulkier with 19% more Health in total than the Imperials despite having less soldiers.
- Average Defense shows us that Kriegs have 42% more defense, which means that they will take a lot less damage.
- Survivability Score is something I created to compare units. This score shows that Kriegs are roughly 2 times more robust or likely to survive compared to the Imperials.
- Damage Output = Soldiers x Damage. This shows that on the most basic comparison Imperials do 37% more damage (if nobody touches them)
- Full Unit Potential Damage = adjusting the Damage output with several factors: 1) Ammo Penalty for Kriegs, 2) Volley bonus for Imperials, 3) Survivability penalty for Imperials. This basically shows that the Imperials, in average over many battles, will not do their original damage output of 65,088 but more like 43,520 which is 33% less whereas the Kriegs only drop by 20% and this is mostly because they have to re-supply more frequently which forces them to walk away from the fighting.
| Elements | Kriegsrat Fusiliers | Imperial Arquebusiers |
| Full Unit Health | 71,550 | 60,168 |
| Average Defense | 410 | 289 |
| Survivability Score | 1,009 | 540 |
| Damage Output | 47,466 | 65,088 |
| Full Unit Potential Damage | 37,973 | 43,520 |
Conclusion
Here is what this analysis tells the player:
- If you can play in such a way as to keep the Imperial Arquebusiers away from the enemy and not letting the enemy engage them in melee then they will definitely outshine Kriegsrat Fusiliers in terms of damage output.
- However, the Kriegsrat Fusiliers, I believe, provide a more predictable or “safe” damage output because they have significantly higher chances to survive, which also directly impacts the damage output. Imagine if a melee unit charges you and let’s assume your unit kills them but suffers some losses: the Imperials may lose more than half of their soldiers drastically reducing their damage output while the Kriegs will likely lose only a few thereby mostly keeping their damage output solid.
- Lastly, another factor that we did not talk about which favors the Kriegs is the impact on your profitability. Since less of them will die then you will need to spend less on Healing and replacing Unit Kits. This means that the player would end up making more profit using Kriegs.
My recommendation for the majority of players is to choose Kriegsrat Fusiliers versus Imperial Arquebusiers while, for expert players who can “guarantee” good battlefield placement, Imperials is a better choice.
Read more guides, tips, analysis on my Conqueror’s Blade Blog:![]()
The post Imperial Arquebusiers vs Kriegsrat Fusiliers comparison – Conqueror’s Blade appeared first on DolyGames.
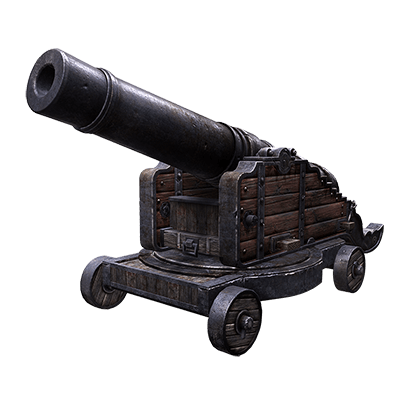
]]>The post What’s a Large Artillery Piece in Conqueror’s Blade? appeared first on DolyGames.
]]>
Even after playing many hours and destroying dozens of various cannons and other artillery a player is shocked to discover that they have destroyed still zero!
I don’t know if this is a bad English issue or simply the game doing a terrible job in guiding the player…
What the game’s definition is for Large Artillery pieces:
So for the game these are, essentially:
- Battering Rams
- Siege Towers
- Trebuchet (see note below)
- Catapults (harder to find)
- Special / my solution (see below)
I have seen a lot of players complain that it is impossible or extremely difficult to do this because, as a castle defender, most of the time your cannons are destroyed very fast giving you no chance to shoot down Battering Rams and Siege Towers.
Using own cannon:
Some players recommend putting your own green cannon a bit far from the wall and shoot with it, which is definitely one way of doing it, although, still, depending on the castle and battle this can also be destroyed or you may simply not have the time to do the job alone until the Siege Tower reaches your castle wall.
About Trebuchet:
The Trebuchet has a huge amount of Health and if you have the idea to run to them and try to destroy one with your bare hands (and weapon) then forget about it – it can be done but would take a VERY long time.
Other Structures
I also saw recommendations that certain town structures may also be considered “large pieces”, but I could not get a confirmation if destroying these works because I blew up a dozen of various buildings and overhangs and still did not get a point for this quest.
An Awesome Solution: My discovery / recommendation!
Just by luck I noticed these anti-arrow protective siege unit structures outside the castle walls. They do nothing at all and are there only for hiding perhaps (or decoration), but I have never seen any player use them.
So I thought would these fall into the category of “large artillery piece”? So I went ahead and destroyed one which was not too difficult and I was very happy to discover that they do count!
Therefore I totally recommend destroying these for this specific Conqueror’s Blade quest and that way you:
- Will not waste a cannon.
- Will not lose too much time.
- Will not be forced to abandon your team and go to the enemy siege area for this quest.
- AND you can get multiple points from one battle (since there are a bunch of them outside)

And here the confirmation that it indeed works:

So there you have it – this post hopefully covers everything you need to know to complete this quest and if someone has any additional Conqueror’s Blade tips regarding this topic of Large Artillery pieces, or knows the name of this artillery piece, please feel free to post in the comments below.
Read more guides, tips, analysis on my Conqueror’s Blade Blog:![]()
The post What’s a Large Artillery Piece in Conqueror’s Blade? appeared first on DolyGames.
]]>The post What Units gain when Level Up – Conqueror’s Blade appeared first on DolyGames.
]]>In this blog post I focus on the gains per level as I was curious how much better units become versus what is “advertised” and also because someone told me that units gain health and damage and all stats improve and I wanted to check if this is true.
To do this I simply took a picture of my Spear Sergeants and Pike Militia before they leveled up and here I show you the result:
Spear Sergeants Level 11 to Level 12
On the picture below you see my Spear Sergeants leveling up to Level 12 and, to my surprise, the only change I could see was an increase in Health from 8531 to 8699, which is an increase of 168 or exactly 2%.
I don’t observe any other change in stats purely from the level up.

Pike Militia Level 12 to Level 13
To get further confirmation I did the same for my Pike Militia unit going from level 12 to level 13. Here I saw also only Health improvement from 6863 to 7015 which is an increase of 152 or 2.2%.

Improvement From Level 1 to Level 12 (Spear Sergeants)
Finally, as one level may not seem impressive I wanted to compare the unit I have versus the “advertised” level 1 stats and this is what I saw:
- Health 6659 to 8699, which is an increase of 2040 or 31% (or about 185 per level). This is the most significant change. Note: 3% comes from the first Veteran skill.
- Piercing Armor Penetration from 1336 to 1411 (+75 or +5.6%). Not a very significant change. This is not due to level up – it is due to Uncommon Piercing Doctrine that I have.
- Piercing Damage from 978 to 1036 (+58 or +5.9%). This is not due to level up – it is due to Veteran skill Cold Blood.
- Blunt Defense from 420 to 485 (+65 or +15.5%). This is not due to level up – it is due to Uncommon Blunt Defense Doctrine that I have.

Conclusion
So to conclude, based on the data I have so far I can safely say that the only change in the Conqueror’s Blade units when leveling up is an increase in health.
Obviously other things come on top such as Veteran skills (a.k.a. Veterancy) and Doctrines, but levels add only health.
Read more guides, tips, analysis on my Conqueror’s Blade Blog:![]()
The post What Units gain when Level Up – Conqueror’s Blade appeared first on DolyGames.
]]>The post How to get the Best Free Fuel in Minecraft near the sea appeared first on DolyGames.
]]>So let’s start, here are all the super easy steps:
Step 1
Easy peasy! Jump into the water and chop down a heap of kelp.
Info: Kelp naturally grows from the bottom of the sea very tall upwards and requires only that above it is a water block. The height for each plant can vary a lot and the maximum should be ~24 blocks.
Step 2
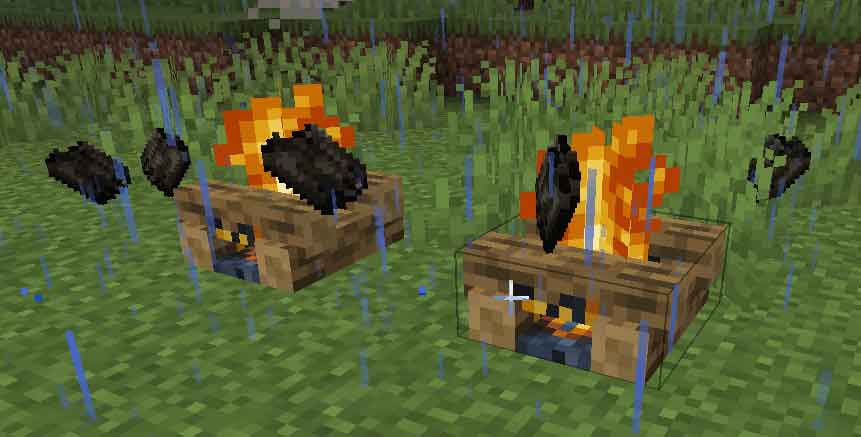
Put some campfires and cook the kelp on them (4 per 1 campfire).
Info: Why campfires? Because it is 100% free to cook kelp on them – no fuel needed. You just click 4 times for each campfire.

Step 3
Once the kelp is cooked the campfires spit out the dry kelp items onto the floor. Just collect it all 🙂
Step 4
Craft dry kelp pieces (per 9) into Dry Kelp Blocks!

Step 5
Cook anything you want using the dry kelp blocks – it can cook up to 20 items! That’s way more than Coal (8 items)!

Q&A
Q: What if my base is not near the sea?
A: Go find the sea (ocean biome) or deeper rivers – you just need to get a bunch of kelp to re-grow it near your base!
Q: How to grow kelp?
A: You just need to create an area of water and plant kelp at the bottom. Also see the more advanced video at the bottom.
Q: Is it possible to automate the process partially or fully?
A: Yes, it is similar to sugar cane farming. Semi-automatic system is very easy to do, but also a fully automated “factory” is possible to construct although it requires a more advanced understanding of Minecraft.
Q: How to make a campfire in Minecraft?
A: 3 sticks + 3 logs + 1 coal or charcoal

Video #1 – Semi-Automated System
Video #2 – Fully Automated System
My Infographic showing all the steps:

Also check out my Minecraft Blog:
The post How to get the Best Free Fuel in Minecraft near the sea appeared first on DolyGames.
]]>The post Cool Things in Minecraft (SEP 2019) appeared first on DolyGames.
]]>Minecraft Breaking News
This is a funny Minecraft picture which I actually created myself 🙂

Minecraft Skyscraper
Created by SiphaCraft, this is the first skyscraper s/he built in Minecraft. I think it’s fantastic especially if it is a first time build.

Minecraft Tank
Created by Xx-GOD-xX, this is a “love it or hate it” type of a build. I don’t like a tank in Minecraft but I do like the effort that has gone into building it, which is why I am posting it.

Minecraft Cathedral (Survival)
A really big Cathedral project – you can see that a lot of work also gone into it. Great job!
The post Cool Things in Minecraft (SEP 2019) appeared first on DolyGames.
]]>The post How to Convert Sticks into Food in Minecraft appeared first on DolyGames.
]]>Unlimited Food, No Farms needed, Convert Sticks into Food!
Getting the wood/sticks
On one side we need to prepare the resources (wood in this case):
- Chop down trees or bamboo.
- Make wood planks from wood logs.
- Make sticks from wood planks or bamboo.
Preparing the Trading
On the other side we need to prepare the villagers to do our trades:
- Build several Fletching Tables and Composters and place them in the village.
- (villagers who do not have a profession will now become Fletchers and Farmers)
- Trade your sticks for emeralds with the Fletcher.
- Trade the emeralds for Bread or Pumpkin Pie or Cake with the Farmer!
If you need more info have a look at my infographic and/or the additional tips and information I have written next.

Additional Tips & Info / Q&A
Q: How to make a Fletching Table in Minecraft ?
A: Use 2 pieces of Flint and any 4 wood planks.

Q: How to make a Composter in Minecraft?
A: Use any 4 fences together with any 3 wood planks OR 7 wood slabs.

Q: How to get Flint in Minecraft?
A: Dig up some Gravel which has a chance to drop Flint. You can find Gravel near water or when mining.
Pro Tip: if you already have some Gravel then all you have to do is keep putting and gathering and you will get lots of Flint.
Q: How to get lots of wood in Minecraft? (to make a lot of sticks)
A: Create a tree farm. Birch trees are really good for this. Plant 4 seeds together in a square and 4×4 trees will grow. Leave 3 tiles of space between trees. You will have lots of wood! 🙂
A2: If you found some bamboo you can make a bamboo farm. Bamboo, in Minecraft, is a fantastic resource! And you can convert the bamboo into sticks! As well as use it in the furnace to cook things!
Q: What if my Fletcher and Farmer don’t offer the trades I need?
A: Easy fix! Break down their tables and wait for them to revert back to normal villagers without a profession. Then put the tables again. Repeat until you have what you need! 🙂
Additional tip: you can only do this in the beginning before leveling them up – you cannot use this trick to change Mater level trades. So just get make sure the initial trades are what you want such as Emeralds for Sticks at the Fletcher and Bread or Pumpkin Pie at the Farmer.
The post How to Convert Sticks into Food in Minecraft appeared first on DolyGames.
]]>The post Cool Things in Minecraft (AUG 2019) appeared first on DolyGames.
]]>Minecraft Starter House
This was created by headshrinker23 in Minecraft survival. I find it very nice 🙂

Minecraft “Fort Behemoth”
Created by nexusium, I find this a massive and good job. I really cannot imagine doing this myself in Minecraft. Really big nice project.
Minecraft Castle
What I like about this Minecraft castle built by JackBenWood is that it has a non-standard shape and looks really cool 🙂
Building a Witch Farm
A really big project and a lot of work also gone into preparing the video. Great job!
The post Cool Things in Minecraft (AUG 2019) appeared first on DolyGames.
]]>The post How I got 601 Shipments in Viking Outpost – TIPS appeared first on DolyGames.
]]>First, I share the pictures (proof) of my achievement.
The victory window I got: “The island of Rum has been picked clean of resources and the Outpost there has now been abandoned (aww, I’m gonna miss my hard work :P). Lord DGCOSMOS (that’s me! 🙂 ) has earned the title of Pathfinder.
(click on pictures to enlarge)

Next is the Leaderboard showing that I achieved the top rank among all those players who participated in this event.

Viking Outpost Tips / Discussion
Alright, let’s start with the tips and/or discussion for the Total War Battles: Kingdom Viking Outpost. In no particular order:
Starting Resources
Be careful with your starting resources. Spend them wisely and you will grow very powerfully. But if you start wasting them right and left your growth will be damaged significantly.
This means for example don’t start putting a ton of Dams because they cost 20 silver and wood (wood you have but the silver you do not!).
When you start, do nothing but look and think how you are going to build as efficiently as possible.
Chopping Trees
Don’t just start cutting down all trees! You will not only quickly reach your wood maximum of 4000 but you significantly damage your forests.
You need to select which trees to cut and allow the others to propagate more trees.
In generally you want to chop down first those trees which are blocking your way, or are right next to water (so new ones will grow fast) or take out the Pines allowing the oak trees to propagate.
Don’t take more than you need to and make sure you never reach your maximum 4000 wood limit!
One method for this is to upgrade the level 1 Blacksmith to level 2 using stone and wood which you have (silver you do not) and the only reason for this upgrade is to find a place to spend the wood (the fact that it will give you more silver is actually secondary!). This will reduce your wood by 400 (as shown on the picture below).

Furthemore, use the Master for one of the Woodcutters that you have which gives you 25% chance to get silver instead of wood. Assign this Master to the one which will be chopping the most amount of trees. Then UN-assign before you go to sleep so that you can put it on another Woodcutter on the next day.
Silver and Food
Think about getting silver and food when you start. Wood is aplenty at the beginning (but is the most needed resources at the end) and Stone is gotten quite easily via several Quarries.
The food will start coming in once you get some Farms going.
Silver will be the most difficult at the beginning as only Blacksmiths produce it and you need to man them first before they work.
Re-Prospect
As you need silver more than stone, keep on re-prospecting with your Quarries (assuming you fixed your food income) to find a silver mine. The chance is low to find one so you have to prospect a lot (in average). Finding a silver mine is like getting a free working Blacksmith!
Use the Quarry Master to increase your chances by 50%.

Upgrading Quarry to level 2
This is also why upgrading your Quarry is one of your primary goals. Because a level 2 Quarry will be able to mine 20 silver (and 20 stone) which is like a level 2 Blacksmith + 2 x Level 1 Quarries combined.
Using Slums
Often players don’t think about slums since they have no chance to produce Craftsmen. However, depending on where your Castle is located in your specific Viking Outpost (they are randomly generated each time), it might be interesting to consider building Slums because they only require food – no silver is used!
They will help you populate the Blacksmiths to start generating silver income and with enough Peasants (10) you can even manually convert into Craftsmen.
However, remember that this is just a startup action and as you progress you will most likely need to demolish the Slums and replace them with Houses.
The Farm Master
The Farm has a Master which one of the buildings can use which makes all the land around the Farm “fertile” allowing for the crops to be planted. This sounds great when you first hear it but there is a disadvantage to it.
You see, the crops which are planted right next to the river (any water) grow twice as fast than the “inner” crops. And this Master’s crops grow the slowest all around. So I only recommend using him when there is no other way.
I generally try to bring a river to produce wheat at the fastest rate possible so I will only use him as a last resort when the geography does not allow it.

Trees need water too
The forest looks a bit misleading making you think that if you chop a tree somewhere in the middle it will grow back. In fact, in order for new trees to grow the soil has to be “fertile” which you can see by the water droplet icon in the tile info. So when thinking about wood income you must consider:
- To cut down trees which are by the water and not those which are standing on non-fertile soil.
- Terraform your geography to direct rivers accordingly for both your Farms and Woodcutters.
Houses or Mansions?
When thinking about building Houses or Mansions the answer is very simple:
- If you are very active Houses are better.
- If you are less active or sleeping over night Mansions are better.
- Mansions are also better at producing Craftsmen.
You can also have a mix, but for the best performance you must be active which leans towards Houses.
The Blacksmith Trick
There is a trick with the Blacksmith which gives a one time small-medium advantage, which I don’t know if it is a bug or works as intended.
If you man a level 1 Blacksmith with the required 1 Craftsman and 4 Peasants and upgrade it to Level 2 (which requires 2 Craftsmen and 3 Peasants) the 1st Peasant will automatically become a full health Craftsman! This is a very nice boost in the beginning of the Viking Outpost.
More Castles
If your map allows it or if you can make more space to build more Castles this will greatly help in 2 regards:
- The main reason is actually getting more Markets. Because if you manage to build up to 10 Markets and man them with Craftsmen then you will be able to exchange goods at the very nice rate of 70%.
- The secondary reason is to build more Blacksmiths for silver income, but this pales in comparison to the Markets.

Using Markets
Using the Market is absolutely critical for ranking high in Viking Outpost in Total War Battles: Kingdom! However, using just 1 Market is ineffective because you get only a 30% exchange for your goods. So you must set a goal to build up as many markets as possible and man them ideally with Craftsmen (maximum is 10 Markets).
There are some exceptions where you may be forced to use only 1 Market to convert your initial wood to silver for example, but do your best to avoid it as this rate is very bad.
There is another speedup which can be seen as an exchange whereby you speedup a level 2 Blacksmith with 50 food to get 20 silver. This is 40% which is better than the Market rate, however note that you are also reducing the life of the workers and therefore I find this also ineffective.
Each additional market will give you +2% and each market manned by Craftsmen will give you +2% so 10 Markets = 10 x 2 = 20% moving the 30% to 50% and if you man them all with Craftsmen that’s another 10 x 2% which brings is to the maximum possible level of 70% (screenshot i posted above).
Getting to the 70% is very difficult! But try to make some way in that direction before you start exchanging resources.
What is the point of Gold in Viking Outpost?
I have seen a lot of players ask what is the point of getting 30 gold when you start Viking Outpost or getting Tombs / Gold Mines during it when there is absolutely nothing you can do with gold there.
Well, there is only one place you can spend the gold, but this one place is very significant. Once you gather 5 additional Gold you will have 35 and with that you can change the season!
This allows you to completely skip the Winter season or go back to Spring where the tree and crop growth is very fast!
Can anyone win in Viking Outpost?
Yes and no.
Everyone has the ability to win, but not everyone will put the time and effort to think smart and actively collect resources when they are ready and invest correctly/smartly prioritizing important goals.
Since growth is somewhat exponential a small mistake in the beginning becomes a massive mistake (or slower growth) down the road. So being very active and making the right decisions is very important for the 1st day.
The 2nd and 3rd days are spend on growing from the investments created during the previous day.
And the last days are the least interesting as your only job is to collect the incomes and send shipments.
So to summarize:
- Everyone can win theoretically.
- Making smart decisions is VERY important.
- Being very active is VERY important.
- (and it also depends if you are competing against strong players or medium players).
Last Words
I hope you enjoyed my big article / tips on the Viking Outpost in Total War Battles: Kingdom! I spent a lot of effort to make it nice and useful for you. If you liked it please like/share it and if you have additional tips or feedback then you are welcome to post it in the comment section below.
The post How I got 601 Shipments in Viking Outpost – TIPS appeared first on DolyGames.
]]>The post Best way to earn Gold in Total War Battles: Kingdom appeared first on DolyGames.
]]>I give an explanation / summary for each building / “business” type and a judgement score from zero to 10 points regarding its ability to generate gold (or at least crafting materials), followed by an overall conclusion at the end. Note: the judgement score is relative among the different possibilities.
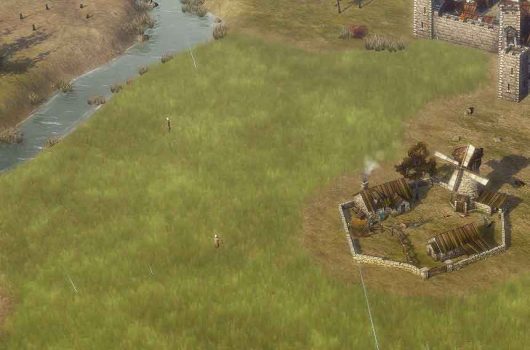
Quarry
Quarry: good “normal” resource income (mainly stone, sometimes silver or crafting materials), but little or no gold.
You basically have a very low chance of finding a Gold Deposit which will have 1, 2 or 3 gold. After playing 200+ hours I cannot say that I got even 1 piece of gold per day from Quarries and I have a lot of them.
Judgement: Score 6/10
(estimated avg. 0-1 gold per day)

Pictures: leader Matthew for +50% prospecting chance:

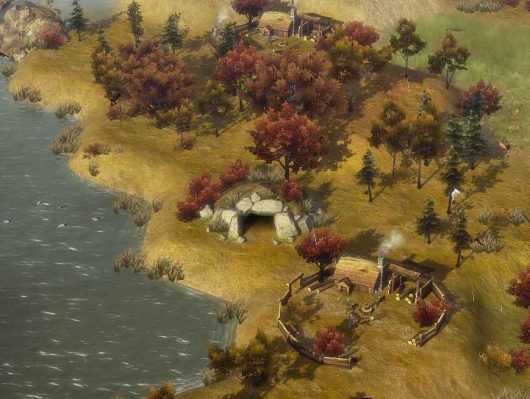
Woodcutters
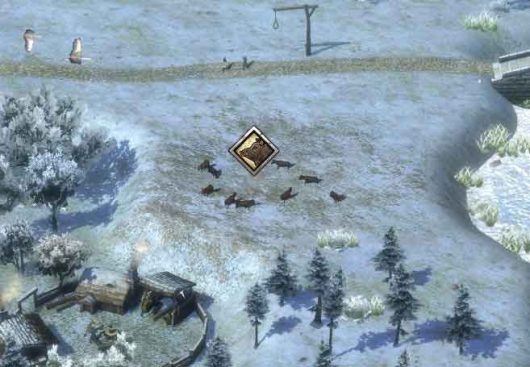
Woodcutters: very slow “normal” resource income (felling trees for wood), but they have a decent chance of a random event giving more income:
- Finding deer: a large amount of food (double if you have assigned the leader Alberto to one of your Castles)
- Finding dead wood: fast gathering of a good amount of wood.
- Finding Boulders: fast gathering of a good amount of stone.
- Finding a Tomb: exploring it either gives you 1 or 2 gold or kills some of your workers.
And you can also Track Beasts which has a chance to give you 30 honor (boars), 3 crafting materials (bears).
The problem with woodcutters is that in the winter season trees don’t grow. In other seasons trees can grow fast or slow.
Judgement: Score 10/10
(estimated avg. 0-5 gold per day)
Pictures: earning gold via Tomb

Image: Woodcutter and Tomb:
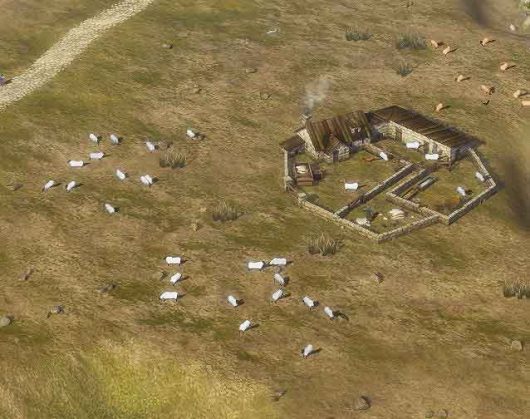
Pictures: Boulders
Pictures: leader Alberto for +100% deer hunting income:

Hunting Boars
Just an example picture from “Track Beasts”:
Farm
Farm: only grows wheat. A good source of “normal” resource income (food). There are no random events related to the farm and there is no way to earn gold or crafting materials from it.
The problem with farms is that in the winter season wheat does not grow. In other seasons it can grow fast or slow.
Judgement: Score 0/10
(avg. 0 gold per day)
Road
Road: although not technically a building or an income generating “business”, the road creates a chance for merchants to appear by its side. Once the merchants appear you can collect them rather quickly and gain a good amount of silver.
However, based on my experience they don’t appear frequently enough to worry about this.
Judgement: Score 0/10
(0 gold per day)
Sheep Farm
Sheep Farm: easily placed anywhere on the map, it allows shearing sheep for crafting materials. However, there is no way to earn gold from it.
Judgement: Score 3/10
(0 gold per day)
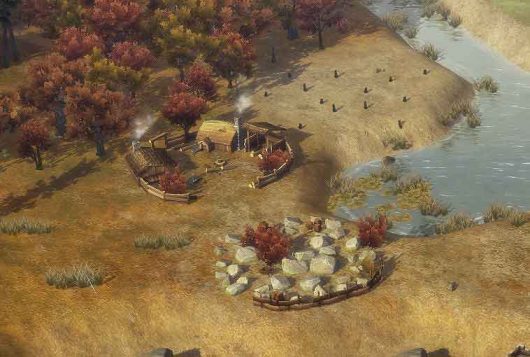
Cattle Farm
Cattle Farm: similar to the sheep farm but with cows and a requirement to be connected by a road. Furthermore, it allows you to only purchase as many cows as you have markets (maximum 10), which is limited.
For all these limitations it does give double the amount of crafting materials compared to sheep or a 15% chance to get 3 pieces of gold.
Mostly it is recommended to take the crafting materials because they are 100% guaranteed while trying to get gold might result in you gaining only some honor.
However, for the purpose of this article, if you manage your cattle/grass well and sell 10 cows per day then you can expect at least 1 of those sales to result in the 3 gold, which we can consider an average daily income of 3 gold (or 60 crafting materials).
Judgement: Score 10/10
(estimated avg. 3 gold per day)

Harbor
Harbor: it has the ability to be a good source of “normal” resources, but unfortunately too few fish show up making Harbors not efficient. They normally produce food but can also produce silver if Captain Jack is assigned. And, like Farms and Woodcutters, the Harbor does not work in the winter season.
However, there is no way to get gold from them.
Judgement: Score 0/10
(0 gold per day)

Tavern
Finally I won’t bring up town buildings here since we build them in any case and there is no “choice” as with the income generating structures above. But the Tavern in the town can have up to a 10% chance to giving 1 piece of gold, but this is both too rare an occurrence and too little gold to pay attention to (not even 1 gold per day in average).
(estimated avg. 0-1 gold per day)
Conclusion: How to earn gold in Total War Battles: Kingdom
Summary of scores:
- Quarry: 6/10
- Woodcutters 10/10
- Farm: 0/10
- Road: 0/10
- Sheep Farm: 3/10
- Cattle Farm: 10/10
- Harbor: 0/10
So to conclude, if a player is thinking about gold income / earning gold, then:
- Do not build any Farms (use Market to exchange for food.)
- Do not build any extra Roads – only what you need to connect.
- Do not build any Harbors (which also means there is no need to create large lakes with deep water)
- And even consider not building any Sheep Farms.
Instead, use the land to maximize:
- #1 One big or 2 Cattle Farms
- #2 Woodcutters
- #3 Quarries
If you have time keep on re-prospecting (even clearing a found resource) to try to find Gold or Coal. Use the leader Matthew (Surveyor) to increase your chances by 50%.
This should result in an estimated 3-10 gold earned per day.
The post Best way to earn Gold in Total War Battles: Kingdom appeared first on DolyGames.
]]>